> ## Documentation Index
> Fetch the complete documentation index at: https://docs.sei.io/llms.txt
> Use this file to discover all available pages before exploring further.
# The Graph
> Build and deploy subgraphs on The Graph to efficiently index and query data from Sei smart contracts, with step-by-step instructions from initialization to production deployment.
Getting historical data on a smart contract can be frustrating when you're
building a dapp. [The Graph](https://thegraph.com/) provides an easy way to
query smart contract data through APIs known as subgraphs. The Graph's
infrastructure relies on a decentralized network of indexers, enabling your dapp
to become truly decentralized.
## Quick Start
These subgraphs only take a few minutes to set up. To get started, follow these
three steps:
1. Initialize your subgraph project
2. Deploy & Publish
3. Query from your dapp
Pricing: **All developers receive 100K free queries per month on the
decentralized network**. After these free queries, you only pay based on usage
at \$4 for every 100K queries.
Here's a step by step walk through:
## 1. Initialize your subgraph project
### Create a subgraph on Subgraph Studio
Go to the [Subgraph Studio](https://thegraph.com/studio/) and connect your
wallet. Once your wallet is connected, you can begin by clicking "Create a
Subgraph". When entering the subgraph name, it is recommended to use Title Case:
"Subgraph Name Chain Name."
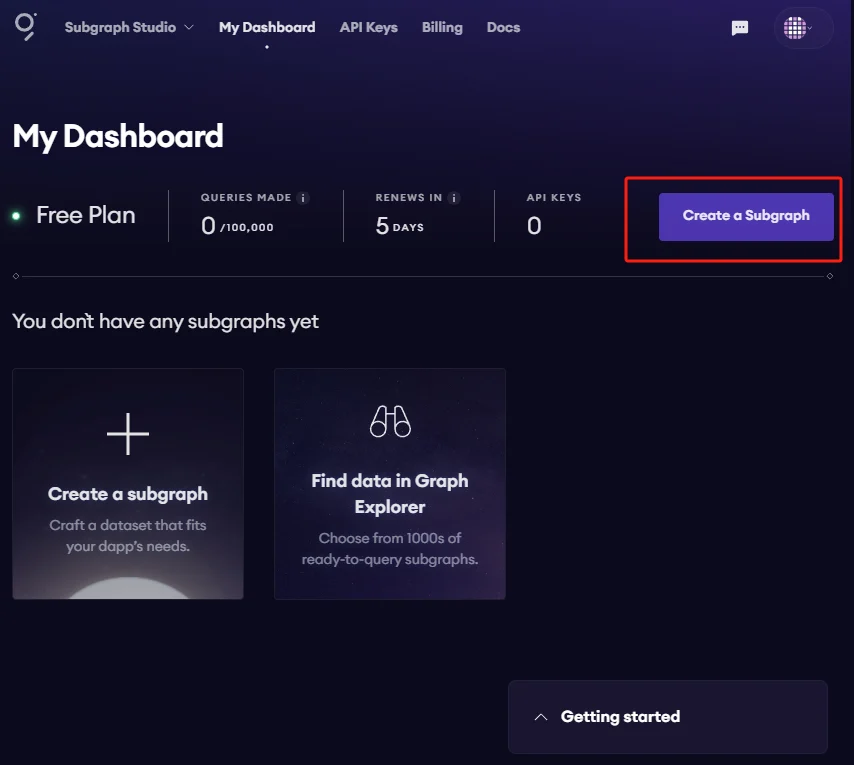 *Create a Subgraph*
You will then land on your subgraph's page. All the CLI commands you need will
be visible on the right side of the page:
*Create a Subgraph*
You will then land on your subgraph's page. All the CLI commands you need will
be visible on the right side of the page:
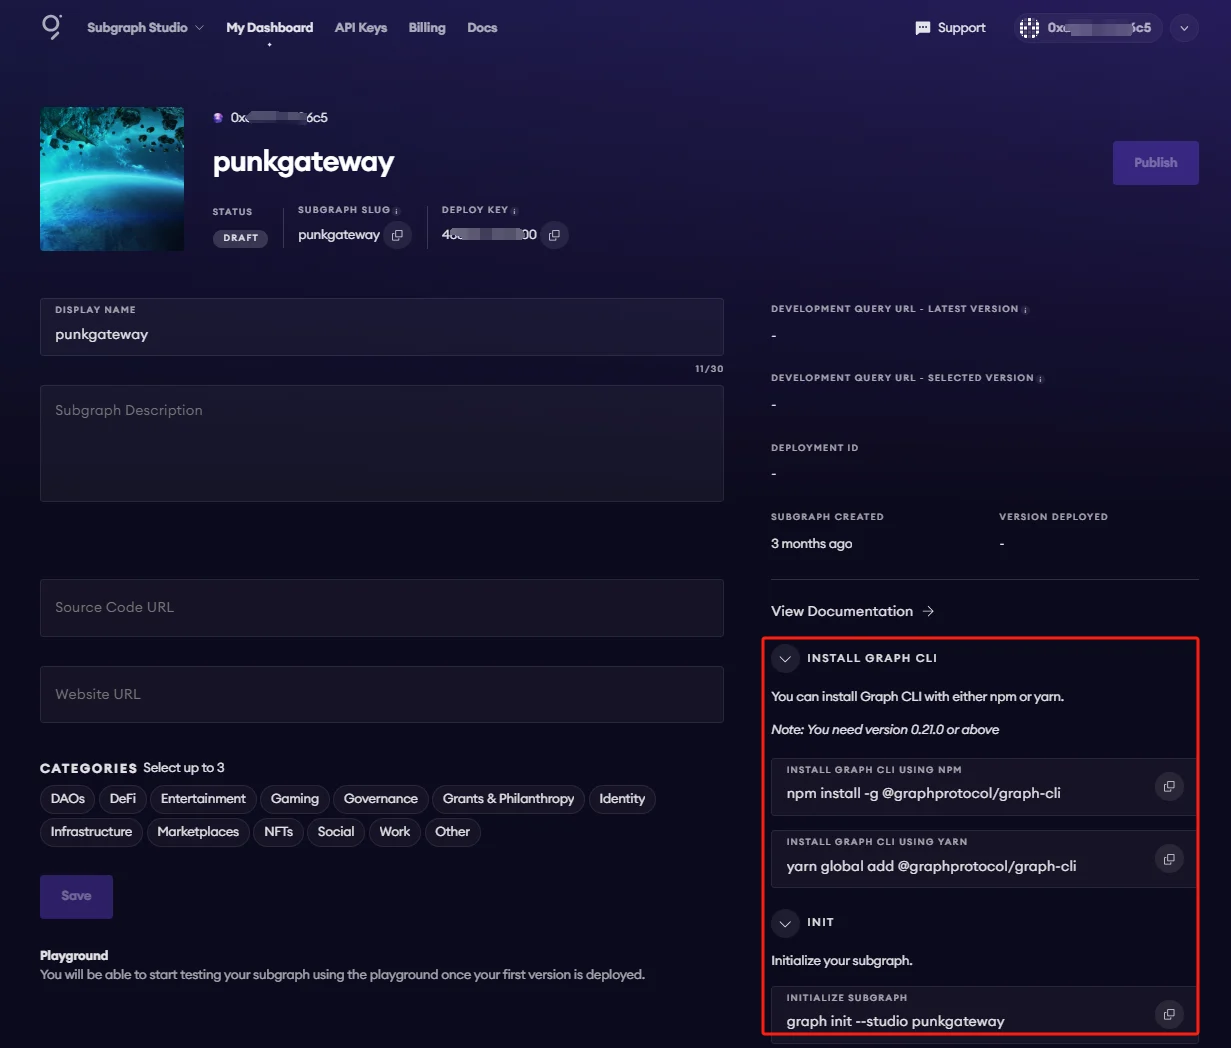 *CLI Commands*
### Install the Graph CLI
On your local machine run the following:
```bash theme={"dark"}
npm install -g @graphprotocol/graph-cli
```
### Initialize your Subgraph
You can copy this directly from your subgraph page to include your specific
subgraph slug:
```bash theme={"dark"}
graph init --studio
```
You'll be prompted to provide some info on your subgraph like this:
*CLI Commands*
### Install the Graph CLI
On your local machine run the following:
```bash theme={"dark"}
npm install -g @graphprotocol/graph-cli
```
### Initialize your Subgraph
You can copy this directly from your subgraph page to include your specific
subgraph slug:
```bash theme={"dark"}
graph init --studio
```
You'll be prompted to provide some info on your subgraph like this:
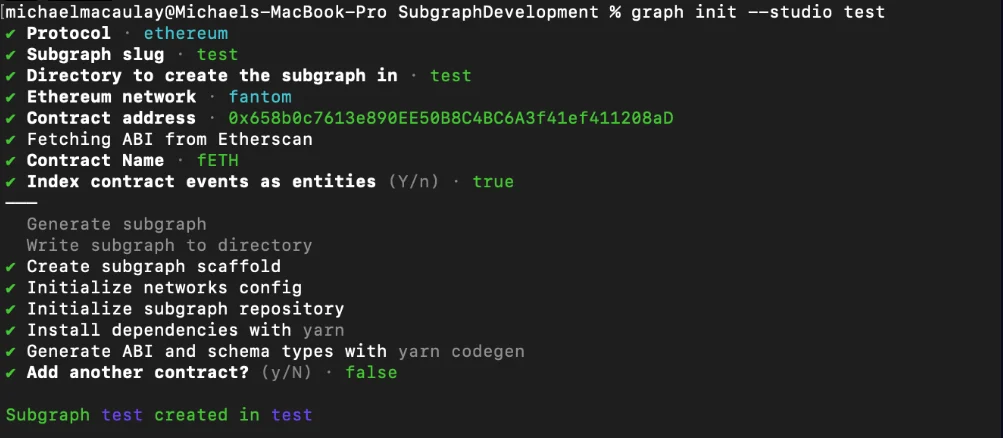 *CLI*
Have your contract verified on the block explorer and the CLI will
automatically obtain the ABI and set up your subgraph. The default settings will
generate an entity for each event.
## 2. Deploy & Publish
### Deploy to Subgraph Studio
First run these commands:
```bash theme={"dark"}
$ graph codegen
$ graph build
```
Then run these to authenticate and deploy your subgraph. You can copy these
commands directly from your subgraph's page in Studio to include your specific
deploy key and subgraph slug:
```bash theme={"dark"}
$ graph auth --studio
$ graph deploy --studio
```
You will be asked for a version label. You can enter something like v0.0.1, but
you're free to choose the format.
### Test your subgraph
You can test your subgraph by making a sample query in the playground section.
The Details tab will show you an API endpoint. You can use that endpoint to test
from your dapp.
*CLI*
Have your contract verified on the block explorer and the CLI will
automatically obtain the ABI and set up your subgraph. The default settings will
generate an entity for each event.
## 2. Deploy & Publish
### Deploy to Subgraph Studio
First run these commands:
```bash theme={"dark"}
$ graph codegen
$ graph build
```
Then run these to authenticate and deploy your subgraph. You can copy these
commands directly from your subgraph's page in Studio to include your specific
deploy key and subgraph slug:
```bash theme={"dark"}
$ graph auth --studio
$ graph deploy --studio
```
You will be asked for a version label. You can enter something like v0.0.1, but
you're free to choose the format.
### Test your subgraph
You can test your subgraph by making a sample query in the playground section.
The Details tab will show you an API endpoint. You can use that endpoint to test
from your dapp.
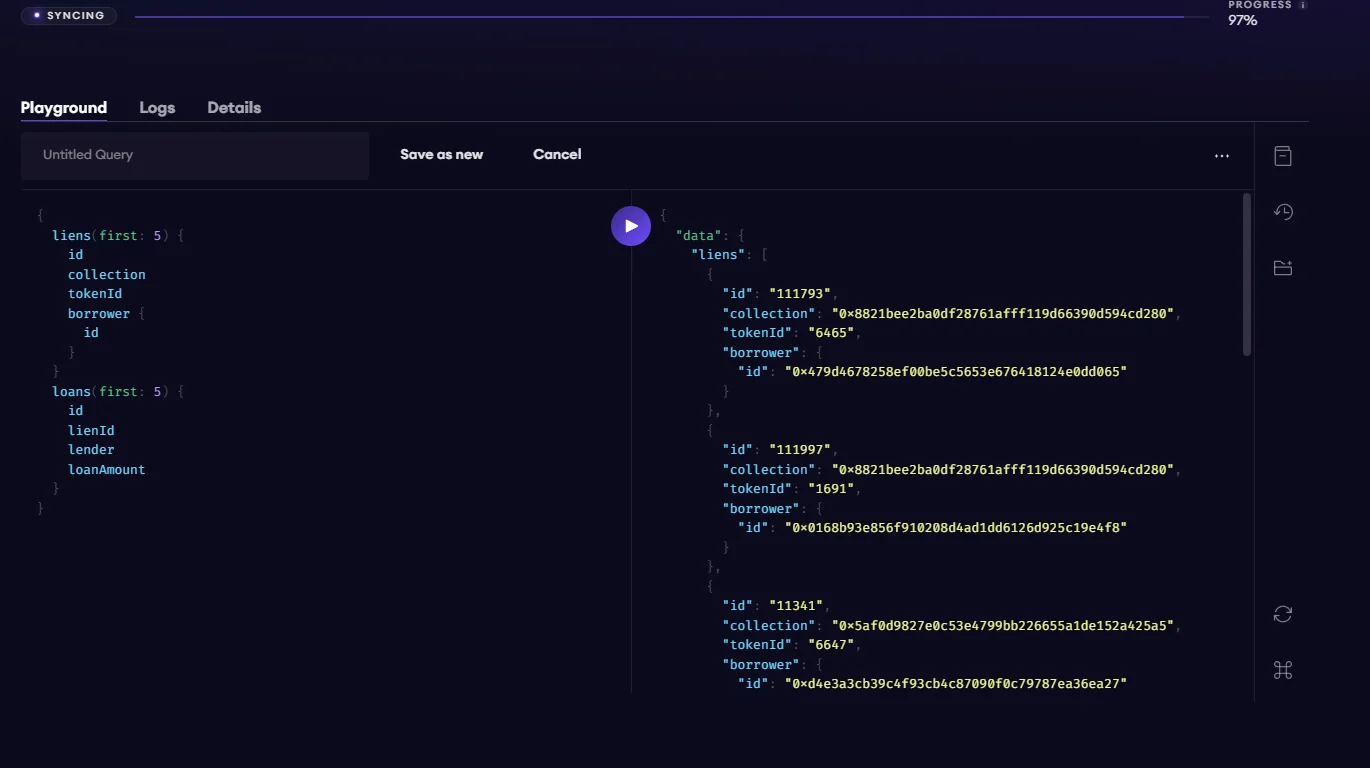 *Run your graphql query in Studio*
### Publish Your Subgraph to The Graph's Decentralized Network
Once your subgraph is ready to be put into production, you can publish it to the
decentralized network. On your subgraph's page in Subgraph Studio, click on the
Publish button:
*Run your graphql query in Studio*
### Publish Your Subgraph to The Graph's Decentralized Network
Once your subgraph is ready to be put into production, you can publish it to the
decentralized network. On your subgraph's page in Subgraph Studio, click on the
Publish button:
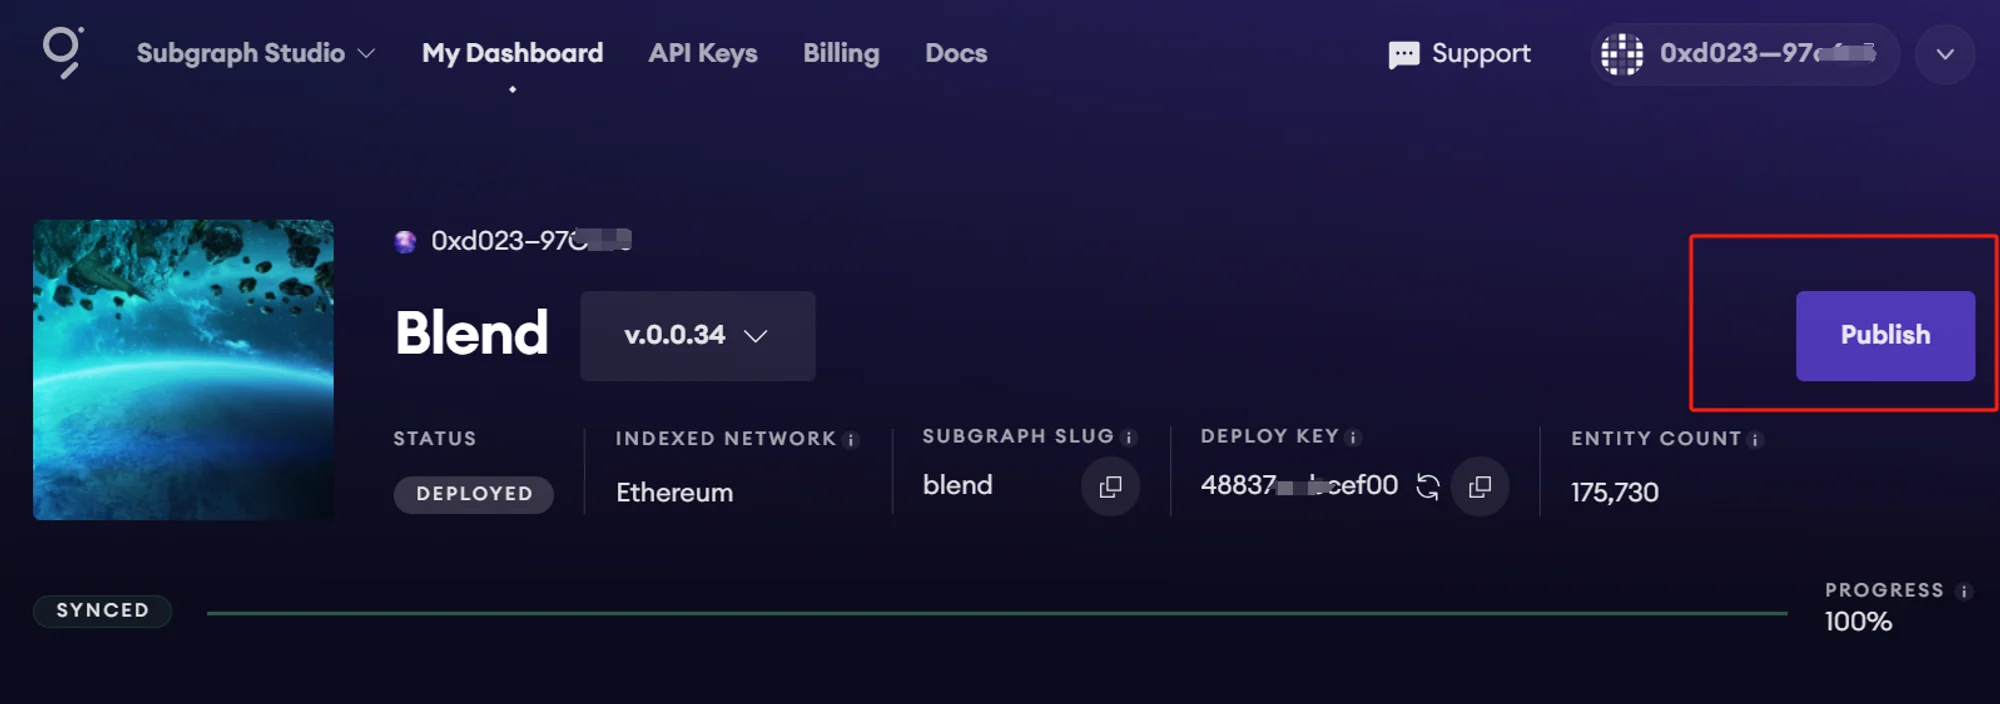 *Click Publish*
Before you can query your subgraph, Indexers need to begin serving queries on
it. In order to streamline this process, you can curate your own subgraph using
GRT.
When publishing, you'll see the option to curate your subgraph. Signaling GRT
on your own subgraph helps ensure that it is indexed and available for querying
as soon as possible. See The Graph's
[curating documentation](https://thegraph.com/docs/en/resources/roles/curating/)
for current guidance on how much GRT to signal.
*Click Publish*
Before you can query your subgraph, Indexers need to begin serving queries on
it. In order to streamline this process, you can curate your own subgraph using
GRT.
When publishing, you'll see the option to curate your subgraph. Signaling GRT
on your own subgraph helps ensure that it is indexed and available for querying
as soon as possible. See The Graph's
[curating documentation](https://thegraph.com/docs/en/resources/roles/curating/)
for current guidance on how much GRT to signal.
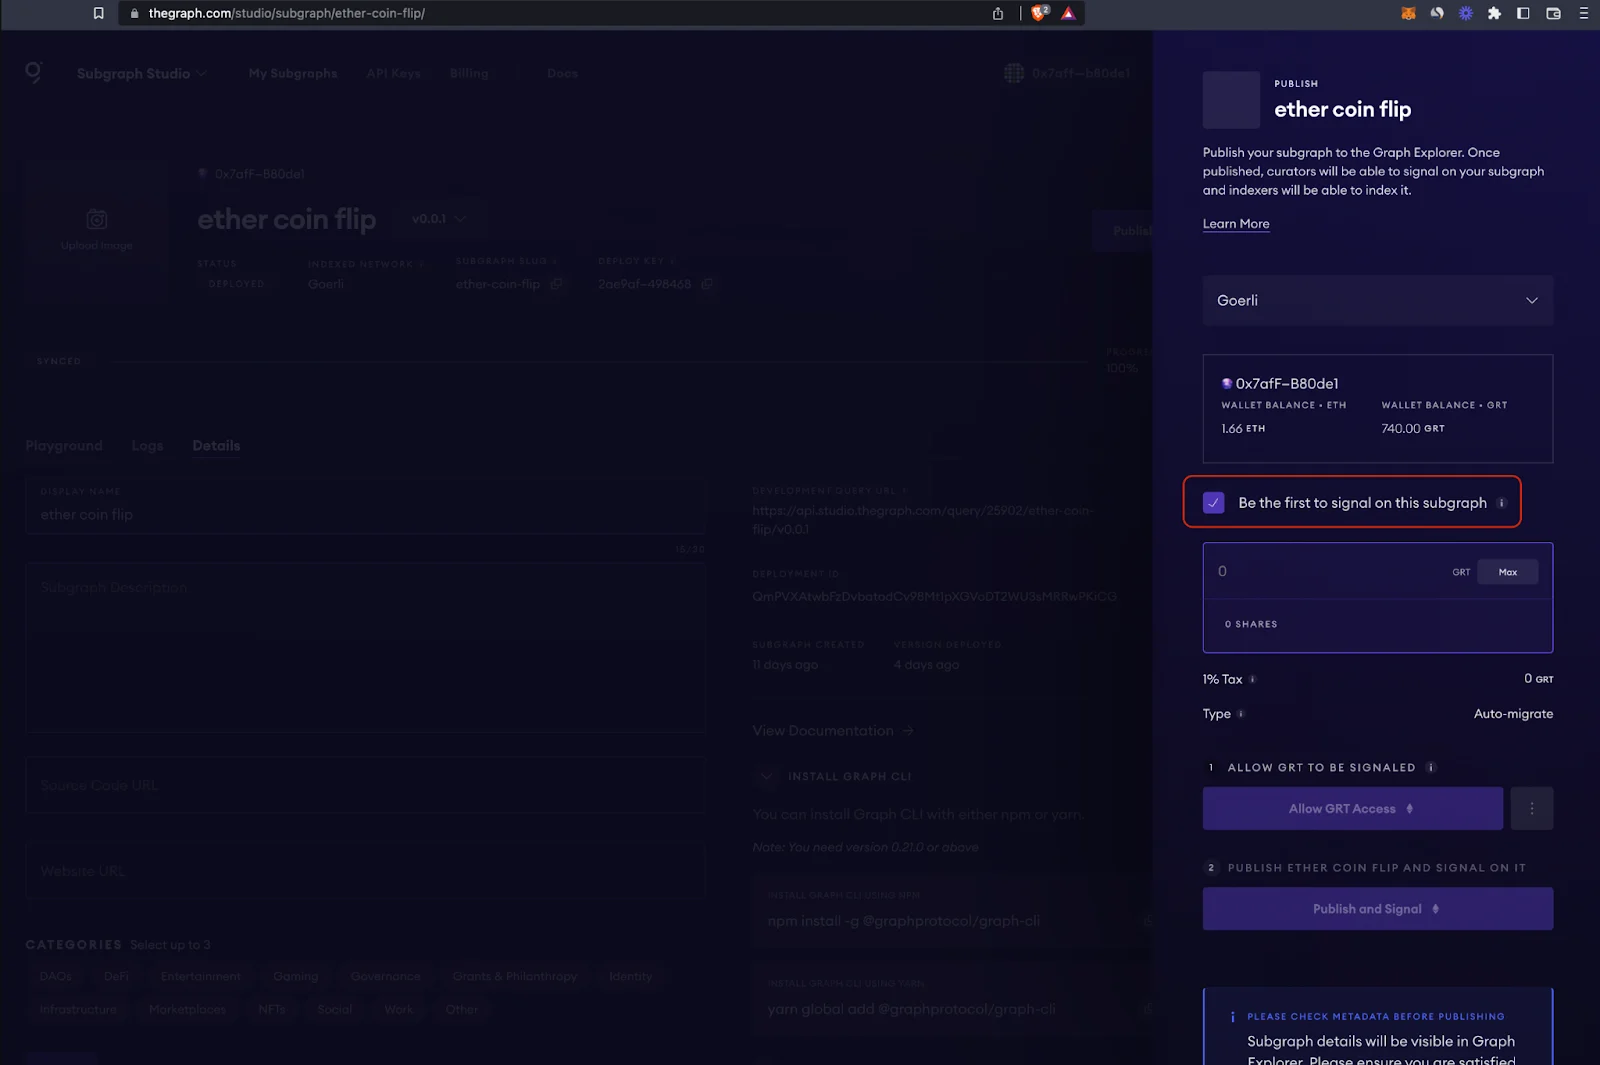 *Publish Screen*
**Note:** The Graph's smart contracts are all on Arbitrum One, even though > your subgraph is indexing data from Ethereum, BSC or any other > [supported chain](https://thegraph.com/docs/en/developing/supported-networks/).
## 3. Query your Subgraph
Congratulations! You can now query your subgraph on the decentralized network!
For any subgraph on the decentralized network, you can start querying it by
passing a GraphQL query into the subgraph's query URL which can be found at the
top of its Explorer page.
Here's an example from the
[CryptoPunks Ethereum subgraph](https://thegraph.com/explorer/subgraphs/HdVdERFUe8h61vm2fDyycHgxjsde5PbB832NHgJfZNqK)
by Messari:
*Publish Screen*
**Note:** The Graph's smart contracts are all on Arbitrum One, even though > your subgraph is indexing data from Ethereum, BSC or any other > [supported chain](https://thegraph.com/docs/en/developing/supported-networks/).
## 3. Query your Subgraph
Congratulations! You can now query your subgraph on the decentralized network!
For any subgraph on the decentralized network, you can start querying it by
passing a GraphQL query into the subgraph's query URL which can be found at the
top of its Explorer page.
Here's an example from the
[CryptoPunks Ethereum subgraph](https://thegraph.com/explorer/subgraphs/HdVdERFUe8h61vm2fDyycHgxjsde5PbB832NHgJfZNqK)
by Messari:
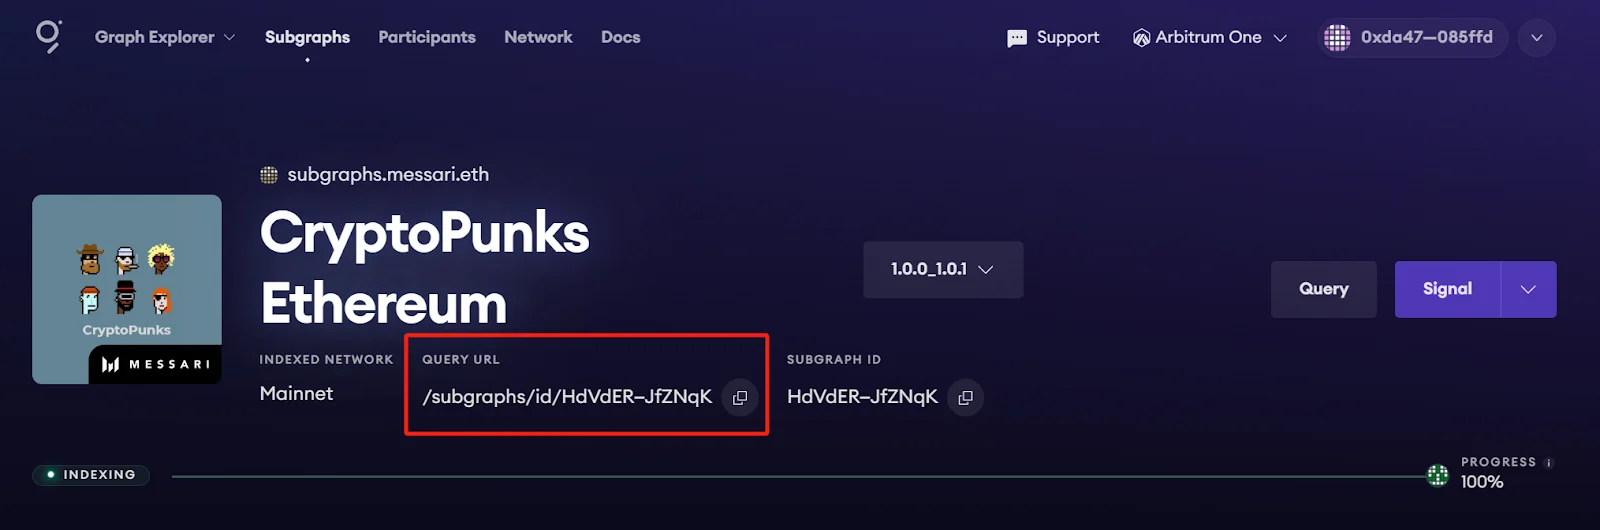 *Query URL*
The query URL for this subgraph is:
`https://gateway-arbitrum.network.thegraph.com/api/`**\[api-key]**`/subgraphs/id/HdVdERFUe8h61vm2fDyycHgxjsde5PbB832NHgJfZNqK`
Now, you need to fill in your own API Key to start sending GraphQL
queries to this endpoint.
### Getting your own API Key
*Query URL*
The query URL for this subgraph is:
`https://gateway-arbitrum.network.thegraph.com/api/`**\[api-key]**`/subgraphs/id/HdVdERFUe8h61vm2fDyycHgxjsde5PbB832NHgJfZNqK`
Now, you need to fill in your own API Key to start sending GraphQL
queries to this endpoint.
### Getting your own API Key
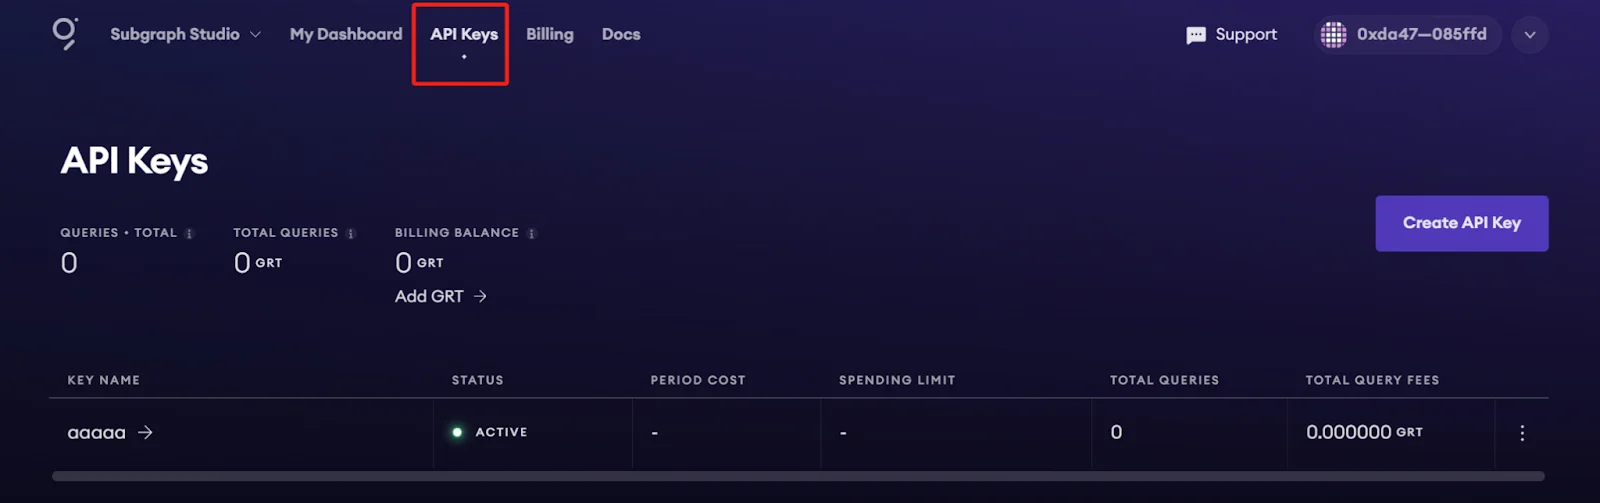 *API keys*
In Subgraph Studio, you'll see the "API Keys" menu at the top of the page. Here
you can create API Keys.
## Appendix
### Sample Query
This query shows the most expensive CryptoPunks sold.
```graphql theme={"dark"}
{
trades(orderBy: priceETH, orderDirection: desc) {
priceETH
tokenId
}
}
```
Passing this into the query URL returns this result:
```json theme={"dark"}
{
"data": {
"trades": [
{
"priceETH": "124457.067524886018255505",
"tokenId": "9998"
},
{
"priceETH": "8000",
"tokenId": "5822"
},
// ...
```
Trivia: Looking at the top sales on [CryptoPunks website](https://cryptopunks.app/cryptopunks/topsales) it looks like the top sale is Punk #5822, not #9998. Why? Because they censor the flash-loan sale that happened.
### Sample code
```jsx theme={"dark"}
const axios = require('axios');
const graphqlQuery = `{
trades(orderBy: priceETH, orderDirection: desc) {
priceETH
tokenId
}
}`;
const queryUrl = 'https://gateway-arbitrum.network.thegraph.com/api/[api-key]/subgraphs/id/HdVdERFUe8h61vm2fDyycHgxjsde5PbB832NHgJfZNqK';
const graphQLRequest = {
method: 'post',
url: queryUrl,
data: {
query: graphqlQuery
}
};
// Send the GraphQL query
axios(graphQLRequest)
.then((response) => {
// Handle the response here
const data = response.data.data;
console.log(data);
})
.catch((error) => {
// Handle any errors
console.error(error);
});
```
### Additional resources:
* To explore all the ways you can optimize & customize your subgraph for a
better performance, read more about
[creating a subgraph here](https://thegraph.com/docs/en/developing/creating-a-subgraph/).
* For more information about querying data from your subgraph, read more
[here](https://thegraph.com/docs/en/querying/querying-the-graph/).
*API keys*
In Subgraph Studio, you'll see the "API Keys" menu at the top of the page. Here
you can create API Keys.
## Appendix
### Sample Query
This query shows the most expensive CryptoPunks sold.
```graphql theme={"dark"}
{
trades(orderBy: priceETH, orderDirection: desc) {
priceETH
tokenId
}
}
```
Passing this into the query URL returns this result:
```json theme={"dark"}
{
"data": {
"trades": [
{
"priceETH": "124457.067524886018255505",
"tokenId": "9998"
},
{
"priceETH": "8000",
"tokenId": "5822"
},
// ...
```
Trivia: Looking at the top sales on [CryptoPunks website](https://cryptopunks.app/cryptopunks/topsales) it looks like the top sale is Punk #5822, not #9998. Why? Because they censor the flash-loan sale that happened.
### Sample code
```jsx theme={"dark"}
const axios = require('axios');
const graphqlQuery = `{
trades(orderBy: priceETH, orderDirection: desc) {
priceETH
tokenId
}
}`;
const queryUrl = 'https://gateway-arbitrum.network.thegraph.com/api/[api-key]/subgraphs/id/HdVdERFUe8h61vm2fDyycHgxjsde5PbB832NHgJfZNqK';
const graphQLRequest = {
method: 'post',
url: queryUrl,
data: {
query: graphqlQuery
}
};
// Send the GraphQL query
axios(graphQLRequest)
.then((response) => {
// Handle the response here
const data = response.data.data;
console.log(data);
})
.catch((error) => {
// Handle any errors
console.error(error);
});
```
### Additional resources:
* To explore all the ways you can optimize & customize your subgraph for a
better performance, read more about
[creating a subgraph here](https://thegraph.com/docs/en/developing/creating-a-subgraph/).
* For more information about querying data from your subgraph, read more
[here](https://thegraph.com/docs/en/querying/querying-the-graph/).